[리눅스] Ubuntu Sever, 패키지 설치 4일차-2
오늘은 VirtualBox에 Ubuntu Server 22.04.2 LTS를 설치했다.
Ubuntu를 설치하기 전 계획을 먼저 세우고 세운 계획 대로 설치를 진행하였다.
기본 설정
가상 머신 이름 : MyUbuntu
RAM : 2G HDD : 30G
Processor : 2개
Hostname : lsh98
일반 사용자 ID: lsh98
일반 사용자 PW : jj
포트 포워딩 설정
22 80 8000 8080
파티션 설정
/boot 1G
swap 2G
/ 12G
/ home 5G
/ data 나머지(10G)
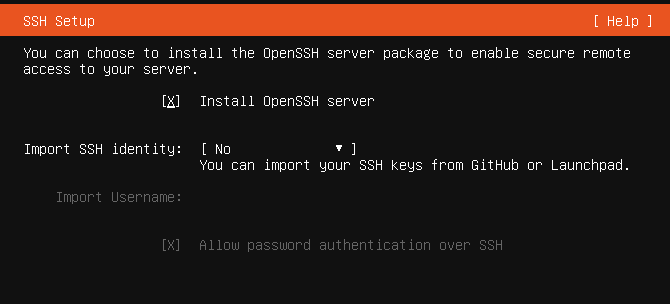
SSH server는 반드시 설치해야한다.
패키지 설치
설치 완료 후 기본적으로 필요한 패키지 등을 설치하고 유용한 설정을 해준다.
먼저 필수 패키지 들을 설치해 준다.
우분투에서 사용하는 apt 패키지 관리자로 설치를 진행한다
먼저 root 권한으로 전환 하자
$ root -i
하고 비밀번호 입력하자
$apt -y install gcc g++ default-jdk mysql-server apache2 wget make
$apt -y install mandoc sqlite3 rdate rename tree mailutils lynx tomcat9
-y 는 실행과정 중 나오는 표에 y로 답하는 옵션이다 (자동으로 설치가 완료된다고 보면된다.)
default-jdk는 자바 설치를 위한것이다.
tree는 시스템 구조를 tree로 보여주는 명령어를 실행시킬 때 사용한다.
mysql-server 와 sqlite3은 DB
apache2 와 tomcat9는 WAS 를 위해 설치한다.
패키지가 잘 설치 되었는지 확인 하는 방법은 끝에 패키지명을 넣으면 된다
$apt list '패키지명'
mysql 시스템을 실행시켜 정말로 잘 작동하는지 확인해보자
$systemctl start mysql
$mysql
Welcome to the MySQL monitor.  Commands end with ; or \g.
Your MySQL connection id is 9
Server version: 8.0.32-0ubuntu0.22.04.2 (Ubuntu)

Copyright (c) 2000, 2023, Oracle and/or its affiliates.

Oracle is a registered trademark of Oracle Corporation and/or its
affiliates. Other names may be trademarks of their respective
owners.

Type 'help;' or '\h' for help. Type '\c' to clear the current input statement.

mysql>
mysql> exit
Bye
이번에는 apache서버가 잘 동작하는지 확인해보자
$systemctl start apache2
그 다음 웹브라우저 주소창에 127.0.0.1을 치고 정상적으로 로딩되는지 확인하자.

mysql, apache 모두 정상적으로 작동되는것을 확인했다.
만약 멈추고 싶으면 이렇게 사용하면 된다.
$systemctl stop apache2
Linux 유용한 설정해주기
$vi ~/.bashrc
  1 # ~/.bashrc: executed by bash(1) for non-login shells.
  2 # see /usr/share/doc/bash/examples/startup-files (in the package bash-doc)
  3 # for examples
  4
  5 alias h='history'
  6 alias l='ls -AlF'
  7 alias c='clear'
  8 alias cp='cp -i'
  9 alias mv='mv -i'
 10 alias df='df -h'
 11 alias du='du -sh'
 12 alias li='ls -Ali'
 13 alias lh='ls -Alh'
 14
 15 alias ai='apt -y install'
 16 alias aq='apt list --installed | grep '
 17 alias ac='apt list --installed | wc -l'
vi로 bash 쉘 설정파일인 .bashrc 파일을 수정해보자.
적당한 위치에 커서를 둔 다음 편집모드로 전환하고 alias들을 설정해둔다.
alias를 설정해두고 쉘에서 엔터치고 사용하면된다.
다음으로는 vi 에디터 설정을 해주자
$vi ~/.vimrc
  1 se nu ai ci si ts=4 sw=4 ruler title showmatch
  2 syntax on
  3 hi comment ctermfg=red

  4 ab P printf(" ");
  5 ab J System.out.println(" ");
시간대 변경하기
$ timedatectl set-timezone 'Asia/Seoul'
$date
Fri Apr 27 05:50:02 PM KST 2023
점점 익숙해지고 있다.